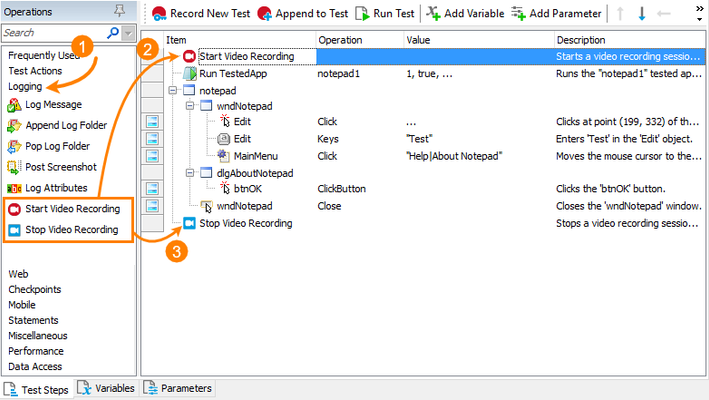
Video Recording of Test Execution is Easy
Hi folks! My name is Alexander Gubarev, and I'm one of the QA engineers who are responsible for the TestComplete quality. Today, I want to share the VideoRecorder extension for TestComplete with you, which I hope will be helpful in your job. This extension enables you to record videos for your automated tests running in SmartBear TestComplete or TestExecute. It records a video for your test runs helping you to check the test execution and to understand what happened in your system and in the tested application during the test run. All of us know, sometimes, it is really difficult to find the cause of issues that occur during nightly test runs. Videos can help you with this. The extension adds the VideoRecorder script object for starting and stopping video recording from your script tests, and the Start and Stop Video Recording keyword-test operations for doing this from keyword tests. Start using the VideoRecorder extension is easy - you simply need to install the extension on your computer and add call of it from TestComplete. INSTALL VIDEORECORDER 1. Download the VLC installer from https://www.videolan.org/. 2. Install the VLC media player on your computer. The installation is straight-forward. Just follow the instructions of the installation wizard. 3. Download VideoRecorder.tcx (it's attached to this article). 4. Close TestComplete or TestExecute. 5. Double-click on the extension and install it in TestComplete or TestExecute. USE VIDEORECORDER 1. In Keyword Tests Add the Start Video Recording and Stop Video Recording operations at the beginning and at the end of your test. You can find these operations in the Logging operation category. 2. In Scripts Use the VideoRecorder.Start() method to start recording and VideoRecorder.Stop() to stop it. Code example: //JScript function foo() { // Start recording with High quality VideoRecorder.Start("High"); //Do some test actions //…. //Stop recording VideoRecorder.Stop(); } Find the recorded video in your project folder – the link to it is located in the Test Log panel. FULL DOCUMENTATION https://github.com/SmartBear/testcomplete-videorecorder-extension/blob/master/README.md WANT TO IMPROVE THE VIDEORECORDER? We put this script extension on GitHub, so you can take part in its development. Feel free to make pull requests which can make this extension better: https://github.com/SmartBear/testcomplete-videorecorder-extension LATEST VIDEORECORDER VERSION Also, to make sure you have the latest version of the script extension, you can download VideoRecorder.tcx from the GitHub repository: https://github.com/SmartBear/testcomplete-videorecorder-extension/releases/latest9.5KViews11likes27Comments
Picking a random row from a dataset as part of a test
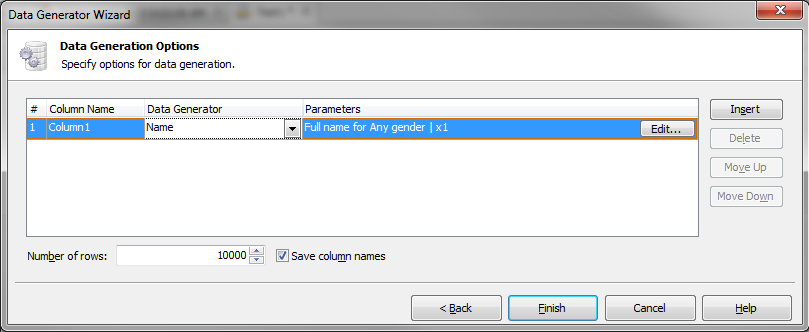
TestComplete has the ability to drive tests using a data source (Excel, CSV, datbase, etc), and there is a Data Loop option built in if you need to repeat the same steps for all the rows in a dataset. Data Driving a Test Case in TestComplete However, there may be times when you don't need to loop through all the data in a dataset and just want to pick one at random. This is a guide showingan example using JScript. Similar functionality is available for other scripting languages as well,with slightly different syntax. 1.) Define your data You can use a pre-defined data source for this, or TestComplete's built-in data generation wizard. In this case I'm using the data generation wizard to create 10,000 random names for me to pick from. This creates a Table variable, and that can be stored in a single Keyword test or with an entire Project. Data Generator Wizard 2.) Create a second variable as an integer to store the random number 3.) In the test, use the Set Variable Value to assign that integer a random number between 1 and the total number of rows in that table. In my case 10,000. Use the Code Expression option for the mode. This example works in JScript, if your Project is in another scripting language the syntax here would need to be adjusted. 4.) Use that integer variable to select a row of your table and return the value, that can be used in the test steps. Related Forum Post: Generating random string values (A - D) & select from dropdown8.1KViews4likes9CommentsTestComplete and (newly released) Zephyr Scale!!!
Update (February 4, 2022): Since my the post was created, some core changes have happened: 1. Atlassian's move to the cloud 2. Zephyr Scale cloud instance having a different set of API's & Bearer token authentication (to the example code snippets provided below) As such I am adding a link (https://community.smartbear.com/html/assets/ZScale.zip) to download the zipped .PJS file of the example integration. A couple things to change in the zipped file to make it work for you: Go to Project variables, find the one called cloud_token, and replace it with yours. (you can get it by clicking on your profile icon in jira, and by clicking zephyr scale api token) (it should say "REPLACE_ME" when you open the project variables page, just to make it extra clear) Go to the script routine called "utilities" Change the createTestRun_cloud function (line 22) project key to your Jira project key where your zephyr scale tests are. Change the createTestRun_cloud function "folderID" value (line 23) to your zephyr scale test folderId (this is optional; you can just delele/comment out this line as well) Change getTestCaseID function (lines 85-88) to match your Zephyr scale test case key (it should be something like JIRAKEY-T<123>) to match the names of the keyword tests that you have in testcomplete (in my case it was "login", "logout", "UI_Error", "UI_Warning", which mapped to KIM-T<123> etc.) Go to the script routine called "test11" change lines (36,37) optional - to match your jira user id (you can google how to find this) Change lines (104) to your jira project key Change lines (105) optional - to the zephyr scale test case folder id (you can google how to get this too) That should be enough to get started on this integration. The rest of the content below is a bit outdated (api's referenced are using server deployments, we no longer need to use the create_test_run item to create cycles -- I created an additional on start event handler to check if the current test is the "first" test item in your project run, etc.), but the general idea remains the same. ------------------------------------ Hi Everyone! Today I'm bringing news about Zephyr Scale (previously called TM4J, a Jira test management plugin that SmartBear acquired a few months ago). This is exciting because Zephyr Scale is considerably different fromZephyr for Jirain a number of ways. The biggest differentiation being that Zephyr Scale creates it's own table in your Jira database to house all of your test case management data and analytics, instead of issues of type "test". This means that you willnotexperience the typical performance degradation that you might expect from housing hundreds if not thousands of test cases within your Jira instance. Additionally, there's many more reports available:Upwards of 70(and it's almost "more the merrier" season so that's nice) Now how does this relate to TestComplete at all? Well, seeing as we don't have a native integration between the two tools as of yet (watch out in the coming months?), we have to rely on using Zephyr Scale's REST apiin order to map to corresponding test cases kept in Zephyr Scale's test library. I wanted to explore the option of having our TestComplete tests be mapped and updated (per execution) back to the corresponding test cases housed within Zephyr Scale by making use of event handlers and the REST api endpoints. To start, I created a set of test cases to mirror the test cases within Zephyr Scale and TestComplete: You will notice that I have a "createTestRun" KDT test within my TestComplete project explorer. This test case will make the initial POST request to Zephyr Scale in order to create a test run (otherwise known as a test cycle). This is done by using TestComplete's aqHttp object. Within that createTestRun kdt, I'm just running a script routine a.k.a run code snippet (because that's the easiest way to use the aqhttp object). The code snippet below shows the calls the snippet directly below is no longer needed for the integration. Instead, the onstart test case event handler (test11/def EventControl1_OnStartTestCase(Sender, StartTestCaseParams)) will go on to check to see if the currently started test case is the first test case in the project run (aka your test cycle), in which case it will create a new cycle for you. import json import base64 #init empty id dictionary id_dict = {} def createTestRun(): projName = "Automated_TestComplete_Run " + str(aqDateTime.Now()) #timestamped test cycle name address = "https://YOUR-JIRA-INSTANCE/rest/atm/1.0/testrun" #TM4J endpoint to create test run username = "JIRA-username" #TM4J username password = "JIRA-password!" #TM4J password # Convert the user credentials to base64 for preemptive authentication credentials = base64.b64encode((username + ":" + password).encode("ascii")).decode("ascii") request = aqHttp.CreatePostRequest(address) request.SetHeader("Authorization", "Basic " + credentials) request.SetHeader("Content-Type", "application/json") #intialize empty item list items= [] for i in range(Project.TestItems.ItemCount): #for all test items listed at the project level entry = {"testCaseKey":getTestCaseID(Project.TestItems.TestItem[i].Name)} #grab each tc key as value pair according to name found in id_dict items.append(entry) #append as a test item #building request body requestBody = { "name" : projName, "projectKey" : "KIM", #jira project key for the tm4j project "items" : items #the items list will hold the key value pairs of the test case keys to be added to this test cycle } response = request.Send(json.dumps(requestBody)) df = json.loads(response.Text) key = str(df["key"]) #set the new test cycle key as a project level variable for later use Project.Variables.testRunKey = key Log.Message(key) #output new test cycle key Within that snippet, you may have noticed an operation called "getTestCaseID()" and this was how I mapped my TestComplete tests back to the Zephyr Scale test cases (by name to their corresponding test id key) as shown below: def getTestCaseID(argument): #list out testcaseID's in dict format - this is where you will map your internal testcases (by name) to their corresponding tm4j testcases id_dict = { "login": "KIM-T279", "logout": "KIM-T280", "createTestRun": "KIM-T281", "UI_Error": "KIM-T282", "UI_Warning": "KIM-T283" } tc_ID = id_dict.get(argument, "Invalid testCase") #get testcase keys by name from dictionary above return tc_ID #output tm4j testcase ID Referring to the screenshots above, you will notice that the names of my KDT are the key values, where as the corresponding Zephyr Scale test id keys are the paired values within theid_dict variable. Now that we have a script to create a new test cycle per execution, which also assigns all test cases (at the project level) to the newly created test cycle, we just need to update that test run with the corresponding execution statuses for each of the test case to be run. We can do this by leveraging TestComplete's (onstoptestcase) Event handler in conjunction with Zephyr Scale's REST api. the Event handler: import json import base64 def EventControl1_OnStopTestCase(Sender, StopTestCaseParams): import utilities #to use the utility functions testrunKey = Project.Variables.testRunKey #grab testrun key from createstRun script tc_name = aqTestCase.CurrentTestCase.Name #grab current testcase name to provide to getTestCaseID function below tcKey = utilities.getTestCaseID(tc_name) #return testcase Key for required resource path below address = "https://YOUR-JIRA-INSTANCE/rest/atm/1.0/testrun/" + str(testrunKey) + "/testcase/" + str(tcKey) + "/testresult" #endpoint to create testrun w test cases username = "JIRA-USERNAME" #TM4J username password = "JIRA-PASSWORD!" #TM4J passowrd # Convert the user credentials to base64 for preemptive authentication credentials = base64.b64encode((username + ":" + password).encode("ascii")).decode("ascii") request = aqHttp.CreatePostRequest(address) request.SetHeader("Authorization", "Basic " + credentials) request.SetHeader("Content-Type", "application/json") #building requirest body; limited to pass,warning, and fail from within TestComplete. mapping to their corresponding execution statuses in tm4j comment = "posting from TestComplete" #default comment to test executions if StopTestCaseParams.Status == 0: # lsOk statusId = "Pass" # Passed elif StopTestCaseParams.Status == 1: # lsWarning statusId = "Warning" # Passed with a warning comment = StopTestCaseParams.FirstWarningMessage elif StopTestCaseParams.Status == 2: # lsError statusId = "Fail" # Failed comment = StopTestCaseParams.FirstErrorMessage #request body for each pertinent statuses requestBody = {"status": statusId,"comment":comment} response = request.Send(json.dumps(requestBody)) #in case the post request fails, let us know via logs if response.StatusCode != 201: Log.Warning("Failed to send results to TM4J. See the Details in the previous message.") We're all set to run our TestComplete tests while having the corresponding execution statuses get automatically updated within Zephyr Scale. Now a few things to remember: always include the "createTestRun" kdt as the topmost test item within our project run. this is needed to create the test cycle within Zephyr Scale (and there was no "onProjectStart" event handler so I needed to do this manually) make sure that within the script routine called gettestcaseID() that you have mapped the key value pairs correctly with the matching names and testcase keys. create a test set within the project explorer, for the test items you'd like to run (which has been mapped per the above bullet point, otherwise the event handler will throw an error). Now every time you run your TestComplete tests, you should see a corresponding test run within Zephyr Scale, with the proper execution statuses and pass/warning/error messages. You can go on to customize/parameterize the POST body that we create to contain even more information (i.e environment, tester, attachments, etc.) and you can go ahead and leverage those Zephyr Scale test management reports now, looking at execution efforts, defects raised, and traceability for all of the TestComplete tests you've designed to report back to Zephyr Scale. Happy Testing!6.9KViews9likes4CommentsScript Extension for Data driven framework!
Hi All, I have prepareda Script Extension for Automation framework (DataDrivenFramework) I guess today is the right to day to present this here. This Script extension controls the execution and generates the Awesome HTML report. And simple to implement. To implement this, youneed setup below things. I have attached sample project for this. Download DataDrivenFramework.tcx file from attachments Follow the instructions in the link to install the Script extension https://support.smartbear.com/testcomplete/docs/working-with/extending/script/installing-and-uninstalling.html Create a function in anywhere in your project and do as below VB: Function InitExecution 'This is to initiate the execution adFramework.startExecution() End Function JavaScript/JScript: Function InitExecution 'This is to initiate the execution adFramework.startExecution() End Function Usually in TC you will Log.Checkpoit or Log.Error functions in-order to make reports but here instead of that use below functions to do the same. It will create TC logs as well as HTML reports. //For adding a passed step adFramework.CreateTestStep(1,"Expected result","Actual result","Testdata used"); //For adding failed step[by default you will see the screenshot in the HTML report] adFramework.CreateTestStep(0,"Expected result","Actual result","Testdata used"); //For adding warning step adFramework.CreateTestStep(2,"Expected result","Actual result","Testdata used"); //For adding warning step with screenshot adFramework.CreateTestStep(2,"Expected result","Actual result","Testdata used",true); //For adding done step [like clicking buttons, and some information messages] adFramework.CreateTestStep(3,"Expected result","Actual result","Testdata used"); //For adding a Title adFramework.CreateTestStep("","Title","","",false,true); In your scripts you need to get the from the Excel for each test case for that you can use below functions //To get the test data from the excel sheet adFramework.GetTestData("ColumnName"); //To get the environment from environment sheet adFramework.GetEnvironmentData("ColumnName"); That's it you got your Data-driven framework. Happy automating! Feel free ask your clarifications on this!5.9KViews5likes29Comments
Difference between Delay() and time.sleep() (python)
Does someone know the qualitative difference between TestCompletes innate 'Delay()' and time.sleep() in Python? I currently have a listener to a connection to ActiveMQ via stomp, and whenever a message arrives the listener will open a file and write the message to this file. Whenever I ran the code nothing was written in the file and when I tried deleting it I got an error stating that TC was still using this file. After some debugging I switched out TC:s innate Delay() to time.sleep() and then everything suddenly works.Solved4.7KViews0likes5CommentsConnect TestComplete to Oracle database using Oracle Provider for OLE DB
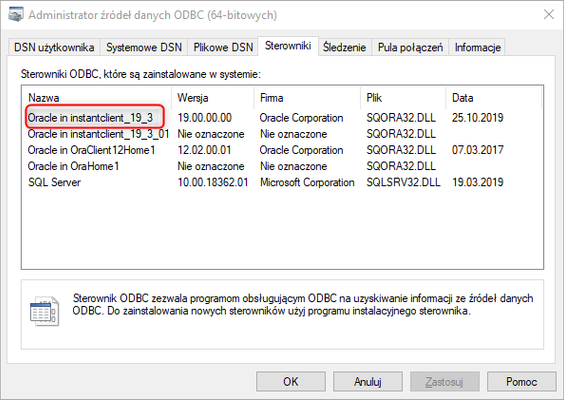
I will share a ready-made solution to connect to the Oracle database but this time using a free driver called "Oracle Provider for OLE DB". Below you will find the installation process and code examples: 1. Install a driver compatible with your version of TestComplete x86/x64 a. Download "Oracle Instant Client Basic Package" Link: https://www.oracle.com/database/technologies/instant-client/winx64-64-downloads.html b. download "ODBC Package" Link: https://www.oracle.com/database/technologies/instant-client/winx64-64-downloads.html 2. Unzip both downloaded folders to one location for example (C:\ininstantclient_19_3) 3. Install the ODBC driver by running the file "odbc_install.exe" as an administrator 4. Verify the installed ODBC driver is correct: a. in the "Run" field, type "ODBC" and select the version that is compatible with the installed one b. go to the "Drivers" tab. c. verify if there is an entry with the installed position in it 5. Validate the set environment variables: a. PATH: Add "C:\ininstantclient_19_3" b. TNS_ADMIN: add "'C:\instantclient_19_3" 6. Select the "Net Configuration Assistant" program from the available applications. a. in the application, select the "Local Net Service Name configuration" option b. in the next window select "Add" c. then enter the database name in the "Service Name" field d. Select "TCP" from the list of protocols e. in the next window fill in "Host name" data e.g. host.com.pl, port 1521 (leave standard) f. we're doing a connection test g. in the launch field enter "ODBC" h. select a version that is compatible with the selected system i. in the ODBC panel add a new item with the "Add" button j. we are completing the data of the newly added item: - "Data Source Name': "Driver_x64", used in ConnectionStrings scripts - "TNS Service Name": in the list, you should have the item configured in "Net Configuration Assistant", select and select -"UserID": "DatabaseUser" k. after the correct configuration of the item select the "Test Connection" button. NOTE: THE VERSION OF THE DRIVER USED MUST MATCH THE VERSION OF TESTCOMPLETE RUNNING Example of a valid JS for connecting TC to Oracle database: var connectstring = "Data Source=DataSourceName;User Id=User;Password=Pass;"; // [1] var query = ADO.CreateADOQuery(); query.ConnectionString = connectstring; query.SQL = ` SELECT mrp.firma_mrp(1) AAAA FROM Firma `; query.Open(); query.First(); var res = query.FieldByName("AAAA").Value; //[2] var conn = ADO.CreateCommand(); conn.ActiveConnection = connectstring; conn.CommandType = adCmdText; conn.CommandText = ` select * from akcje_log; `; var RecSet = conn.Execute(); // Process the results Log.AppendFolder("Opisy_Akcji_Z_Logow"); RecSet.MoveFirst(); while (! RecSet.EOF ) { Log.Message(RecSet.Fields.Item("OPIS_AKCJI").Value); RecSet.MoveNext(); } Helpful links: Doc SmartBear: https://support.smartbear.com/testcomplete/docs/reference/program-objects/ado/index.html https://support.smartbear.com/testcomplete/docs/testing-with/advanced/working-with-external-data-sources/databases/ado-components.html https://support.smartbear.com/testcomplete/docs/reference/program-objects/ado/createcommand.html A list of available „ConnectionStrings” for driver: https://www.connectionstrings.com/oracle-provider-for-ole-db-oraoledb/tns-less-connection-string/ https://www.connectionstrings.com/oracle-provider-for-ole-db-oraoledb/info-and-download/ https://www.connectionstrings.com/oracle-provider-for-ole-db-oraoledb/ Other links useful for configuring and creating queries: https://renenyffenegger.ch/notes/development/databases/ADO/ADODB-examples/Oracle/index https://support.smartbear.com/testcomplete/docs/reference/program-objects/ado/createadoquery.html https://community.smartbear.com/t5/TestComplete-General-Discussions/Error-with-Database-connection/td-p/163103 https://stackoverflow.com/questions/18463496/how-to-run-pl-sql-program-in-oracle-sql-developer https://stackoverflow.com/questions/2373401/with-ado-how-do-i-call-an-oracle-pl-sql-block-and-specify-input-output-bind-var Direct link to Driver: https://www.oracle.com/database/technologies/instant-client/winx64-64-downloads.html I personally spent a few days on configuration and I think that it will help someone to install faster and save time at work.4.6KViews4likes1CommentUpdated: Visual Testing steps in TestComplete ?
Visual testing bugs are valued these days, how to go visual testing to capture the bugs. Can you share your suggestions or steps for the same ? Example: The Logo in a website is validated with the HTML tag Associated but how to check if the logo has changed.4.2KViews0likes11CommentsSteps to Import Python Library in TestComplete
Hi All, Youtube - Import Python Library in TestComplete I've prepared a step to import python library using Openpyxl library inside test complete. Ref Step 1: Install python 3.6 – TestComplete 14.4 Support 3.6 Ref:https://www.python.org/ftp/python/3.6.0/ Check for Python version in Cmd : python –version Step 2: Download the python library matching the Python version.Ref:https://www.lfd.uci.edu/~gohlke/pythonlibs/ Install Numpy/Openpyxl library in the system Install in cmd line as “pip install Openpyxl” In Command Prompt type “Import Openpyxl” If you don’t get any error then the python library is installed correctly. Step 3: Navigate to default python installed location Eg: C:\Users\UserName\AppData\Local\Programs\Python\Python36 2. Copy all the files to TestComplete path Eg: C:\Program Files (x86)\SmartBear\TestComplete 14\Bin\Extensions\Python\Python36 Step 4: Set your environment variable of python path to Testcomplete path Eg: C:\Program Files (x86)\SmartBear\TestComplete 14\Bin\Extensions\Python\ Step 5: from os import sys import sys sys.path.append(“C:\\Program Files (x86)\\SmartBear\\TestComplete 14\\Bin\Extensions\\Python\\”) openpyxl_location = “C:\\Program Files (x86)\\SmartBear\\TestComplete 14\\Bin\Extensions\\Python\\Python36\\Lib\\” sys.path.insert(0, openpyxl_location) import openpyxl from openpyxl import Workbook Ref:https://vallatestcomplete.wordpress.com/2020/06/01/testcomplete-python-library-import/ Regards Valla4KViews4likes2Comments
Javascript for TestComplete
Dear community I just released a course for teaching Javascript to TestComplete testers interested in learning how Javascript works so that they can take advantage of this powerful scripting language inside of TestComplete. The course is purely Javascript to explain all the ins and outs. Everything you learn in the course is 100% usable in TestComplete. The course is free! https://github.com/TheTrainingBoss/Javascript-for-TestComplete Enjoy and good luck! -Lino3.8KViews10likes4Comments